WooCommerce Integration Guide
Before Starting
Available Payment Methods
The payment methods that are available via this plugin:
| Country | 14-day invoice | Fixed Installments | Direct Debit | B2B Payment | Campaign Invoice | Pay-in-3 |
|---|---|---|---|---|---|---|
| Belgium | ✔ | |||||
| Germany | ✔ | ✔ | ✔ | |||
| Austria | ✔ | ✔ | ✔ | |||
| Switzerland | ✔ | |||||
| Sweden | ✔ | ✔ | ✔ | ✔ | ||
| Norway | ✔ | ✔ | ✔ | ✔ | ||
| Finland | ✔ | ✔ | ✔ | ✔ | ||
| Denmark | ✔ | ✔ | ✔ | ✔ | ||
| The Netherlands | ✔ | ✔ | ✔ | ✔ |
Configure Tax Classes
Riverty assumes that your WooCommerce webshop already has the correct tax classes configured (the VAT categories and tax rates for your products). These rules must be configured to ensure that Riverty handles tax, invoicing and settlement correctly. See WooCommerce's own documentation for help.
Strong Customer Authentication (SCA)
Please note, Woocommerce Merchants who have Riverty module version 5.0.0 or newer have SCA activated automatically. SCA increases security and consumer confidence while reducing your exposure to fraud.
Compatibility
The plugin has recently been checked for compatibility with the following Woocommerce versions and external plugins. The compatibility of external plugins is not part of the default test cases for release.
- Woocommerce 6.6.1
- Wordpress 6.0
- Germanized 1.9.6
- Payment Gateway Based Fees and Discounts for WooCommerce 2.3.1
Source code
Our Woocommerce plugin is an open source plugin. The source is maintained in BitBucket, and can be found here: Bitbucket

Step 1: Confirm Plugin Version

- Log into the Wordpress admin environment
- Choose Plugins in the left menu
- Search for Riverty Payment Gateway (or AfterPay Payment Gateway)
- The version number of the plugin should be at least: 7.1.0. If you have an older (lower) version of the Riverty plugin, update to the latest version first. Please access the marketplace to download the file directly from there Riverty Payments for Woocommerce
Step 2: Retrieve your Shop’s API Key
Leave your WooCommerce Settings Panel Open. Choose one of the below below options to access an API Key:
- Open your Test Merchant Portal if you have completed our 5 Minute Onboarding to access a Test Merchant Portal
- Open your sandbox account if your do not want to complete free onboarding at this time
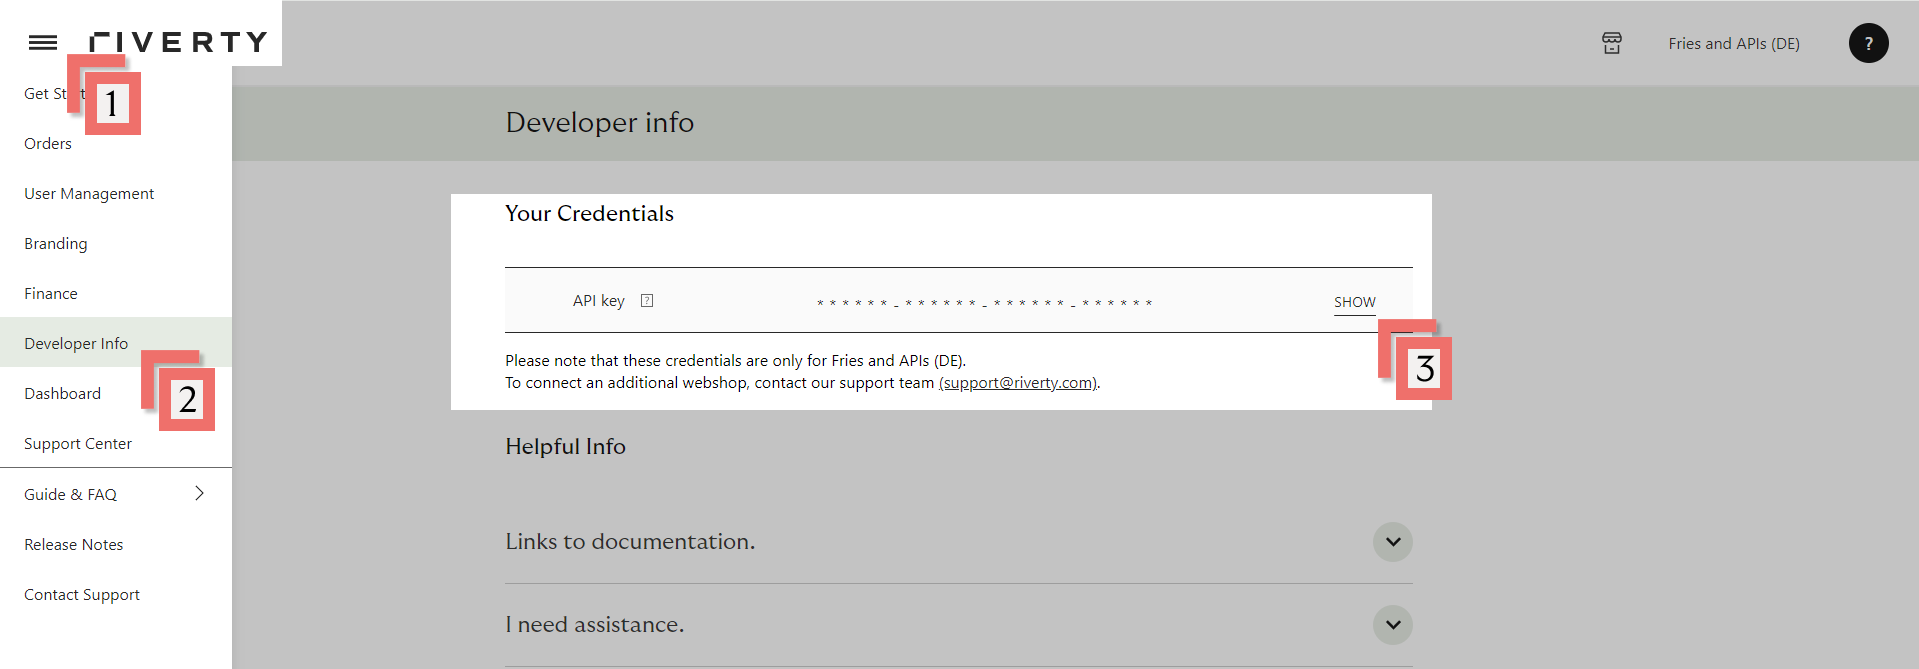
- Open the left menu
- Choose Developer Info in the left menu
- Show your API Key (This is only visible to Merchant Portal users with rights 'Administrator')
Note, you will need to switch countries/shops in the top-right corner of the Riverty Merchant Portal if you plan on using multiple API Keys

Step 3: Select RESTful Payment Methods
Important Note, “Step 3: Store API Key” & “Step 4: Configure RESTful Payment Methods” must be completed for each selected country-payment method combination with a different API Key! (you will get a different API Key per Country, per payment method and per Webshop) For example, if you offer 14-day Invoice in the Netherlands and Belgium, you need to repeat these steps twice with two different API Keys.
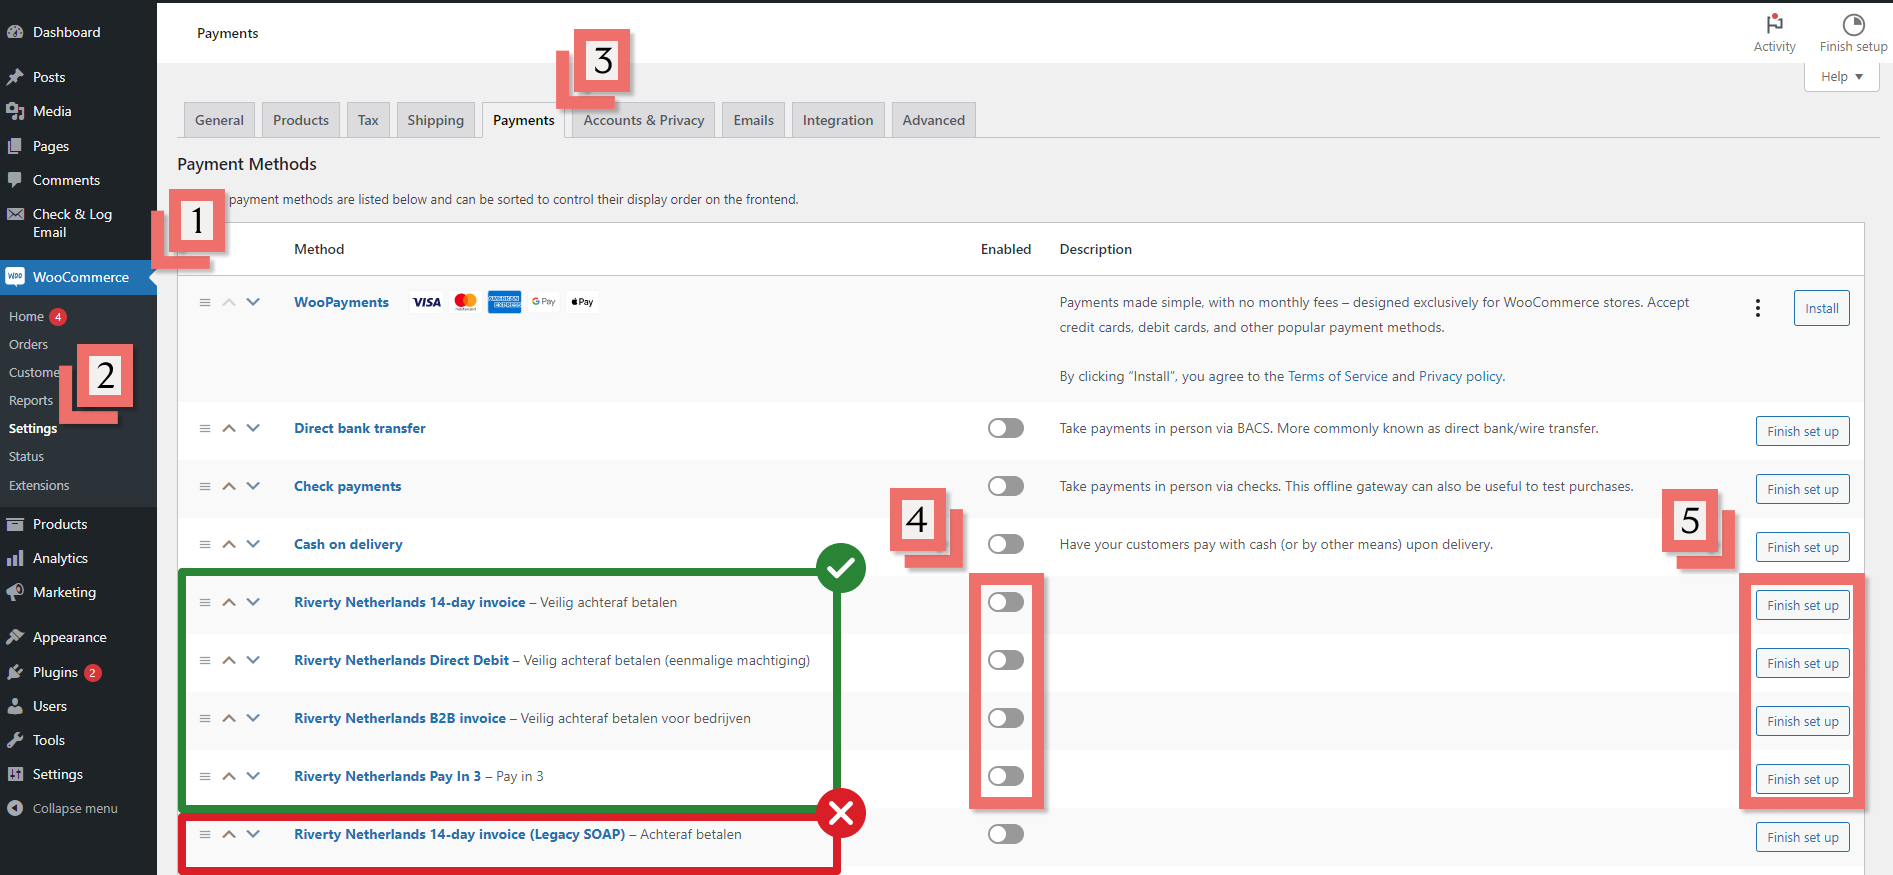
- Sign in to your Woocommerce Admin Panel and Select WooCommerce
- Select Settings
- Select Payments Tab
- Enable Wanted Payments Methods
- Note, any payment methods marked (Legacy SOAP) should not be selected
- Click Finish set up
Step 4: Configure Payment Method
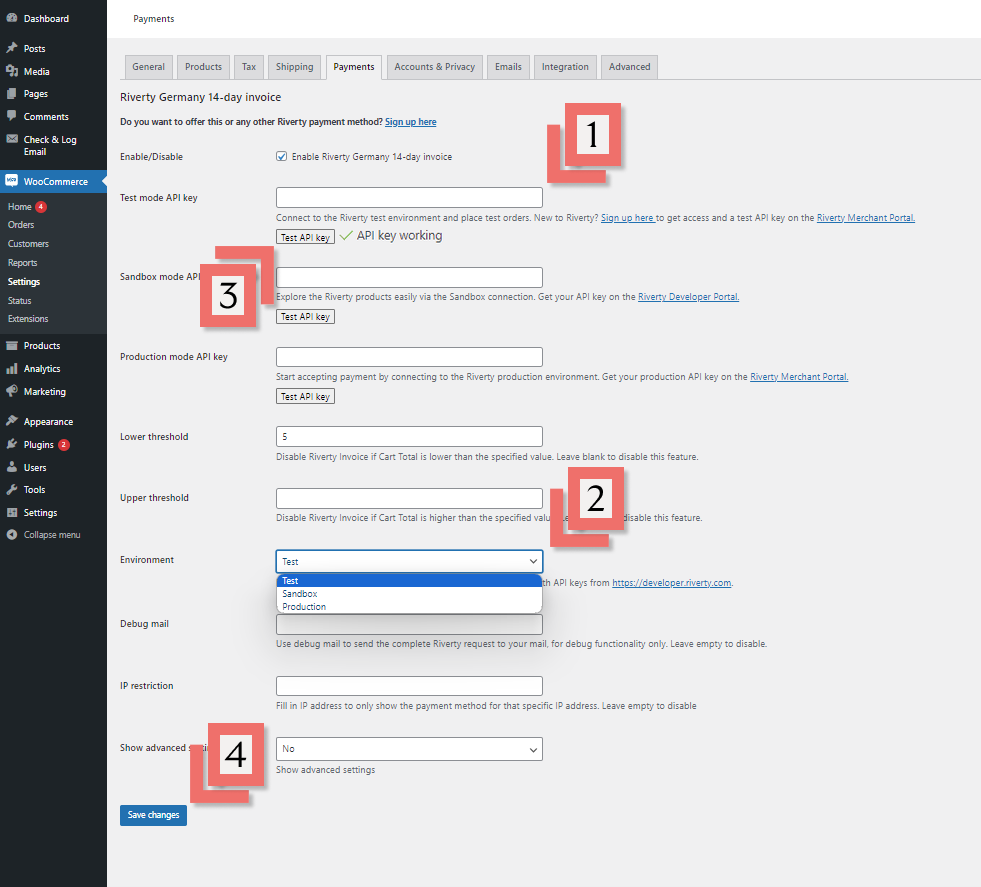
- Enter your API Key from the Merchant Portal into Test mode API Key
- Note, you may use a Sandbox API Key in “Sandbox mode API Key”
- Select Test in Environment
- Note, if you are testing with your Sandbox API Key, select Sandbox instead
- Click Test API Key and a green checkmark should appear
- If the API key test fails, double check the key for typos and confirm it is for the selected environment
- Click Save Changes
- Note, if you are using Sandbox first, you will need to repeat this step with your Test API Key when you are ready
- If successfully saved, the Finish set up button should change to Manage

Step 5: Complete Testing
After completing the setup and tested the API Key, the next step is to test the settings. Everyone must complete the Standard Test Scenarios & Customer Facing Messages. Then also complete the test scenario(s) for each payment method you intend to activate. Be sure to log the Order Number you used for each test case, then submit the completed table to your Riverty Implementation Manager.
Self-Check Before Submission
You can self-check your test cases before submission to the Riverty Implementation Manager using the Get Order call. The response will show you how the transactions registered on Riverty’s side. Completing a self-check greatly increases the chances of passing testing on the first attempt. We suggest using Postman to complete a self-check.
Recommended Test Scenarios for Plugin Integrations
| # | Test | How To | Order Number |
|---|---|---|---|
| 1. | Ensure a successful reservation can be made | Create an order with multiple products and ensure that the order is accepted by Riverty. | |
| 2. | Ensure a reservation can be invoiced | Use the test order of #1 and confirm the shippment off all ordered goods. | |
| 3. | Ensure a invoiced order can be refunded | Use the test order of #1 and refund the entire order. | |
| 4. | Ensure a reservation can be partly invoiced | Create an order with multiple products and confirm the shippment of parts of the order. | |
| 5. | Ensure a invoiced order can be partly refunded | Create an order with multiple products and confirm the refund of parts of the order with a partial refund call. | |
| 6. | Ensure basket values match | Create an order with multiple items and quantities and ensure that the total net and total gross of items match. | |
| 7. | Ensure that mandatory data are submitted | Create an order and ensure that mandatory data are submitted (LineItem, Description, Quantity, VAT, Date of Birth, IP Address) | |
| 8. | Ensure to be able to handle rejected orders | Create an order by using “Reject” as the first name. Ensure that you receive a rejection response that that you show the customer facing error message to your consumer. |
Note: Additional Test cases can be found in the Entire Test Suite
Customer Facing Messages
It is also necessary to check if the error messages are correctly shown to the customer.
- Test a rejected authorize. Please make sure that the customer friendly message is displayed correctly in the check-out.
- Test validation error. Please make sure that the customer friendly message is displayed correctly in the check-out.
Payment method scenarios
After you tested all standard scenarios for the 14-day invoice you should start testing the other payment methods you activated. Please complete the tables with your order numbers and send them to your Riverty Implementation Manager.
Direct Debit
| # | Test Case | Order Number |
|---|---|---|
| D-1. | Test an order with the Direct Debit payment method |
B2B Invoice
| # | Test Case | Order Number |
|---|---|---|
| B-1. | Test an order with the Business to Business payment method |
Campaign Invoice
| # | Test Case | Order Number |
|---|---|---|
| I-1. | Test an order with 3 month installments | |
| I-2. | Test an order with 6 month installments (if applicable) | |
| I-3. | Test an order with 12 month installments (if applicable) |
Installments
| # | Test Case | Order Number |
|---|---|---|
| C-1. | Test an order with the Campaign invoice payment method |
Step 6: Configure Production
Once you have completed testing a Riverty Representative will provide you with your Live API Key or make it available via the Merchant Portal (see step 2). You can then set up your Production Environment.
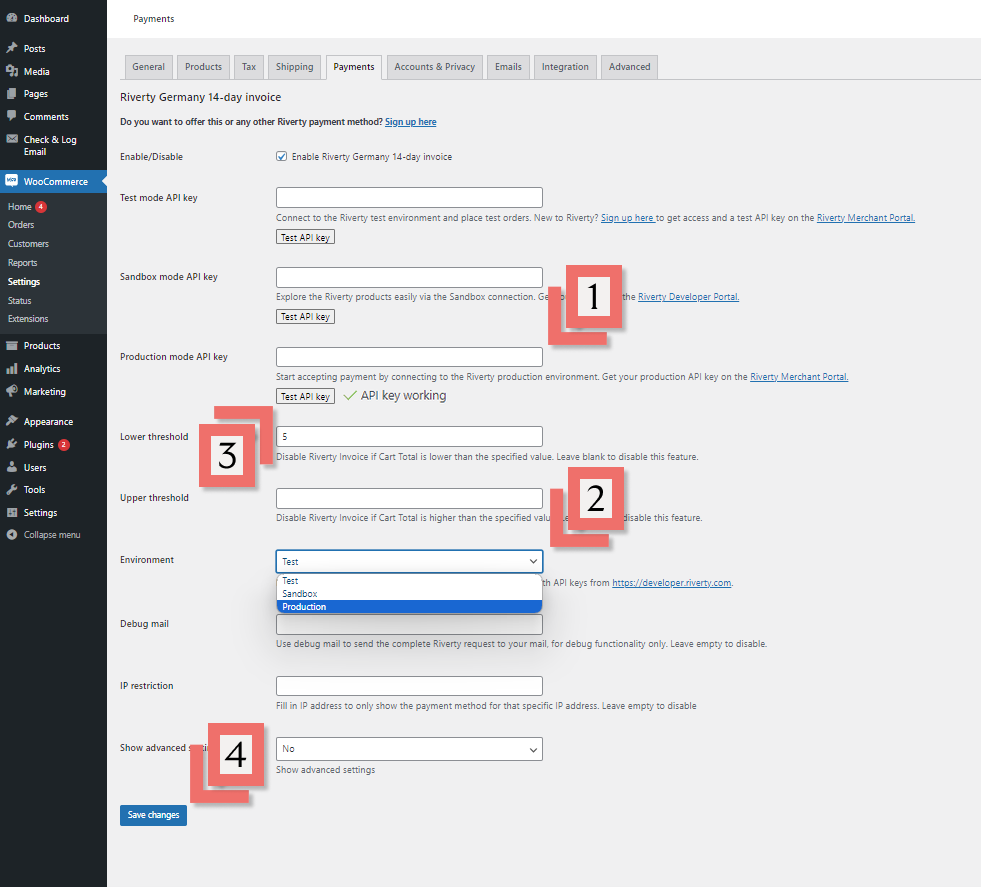
- Enter your API Key from the Merchant Portal into Production mode API Key
- Select Production in Environment
- Click Test API Key and a green checkmark should appear
- If the API key test fails, double check the key for typos and confirm it is for the selected environment
- Click Save Changes
- Repeat "Step 6: Configure Production" for each country-payment method you have selected
Final Check (BeNeLux Only)
Now that Riverty is live, we only have to check whether orders are also coming in properly. You can test this per Riverty connection by placing a rejected order:
- Go to the webshop, and place a product in the shopping cart.
- Go to checkout and fill in the necessary information, for the email address you have to enter rejection@afterpay.nl.
- Choose the payment method Riverty and finish the order.
- The Riverty order should be rejected. If this is not the case and instead you receive a technical error or an authorization error, please contact your Riverty Implementation Manager.