Integration Guide

Step 1: Retrieve API Keys
First thing to set up is your Riverty Credentials and API key. Make sure to enter the API key for the corresponding country where your webshop will be accepting payments. The Production/Live API Key can be found on our Merchant Portal.
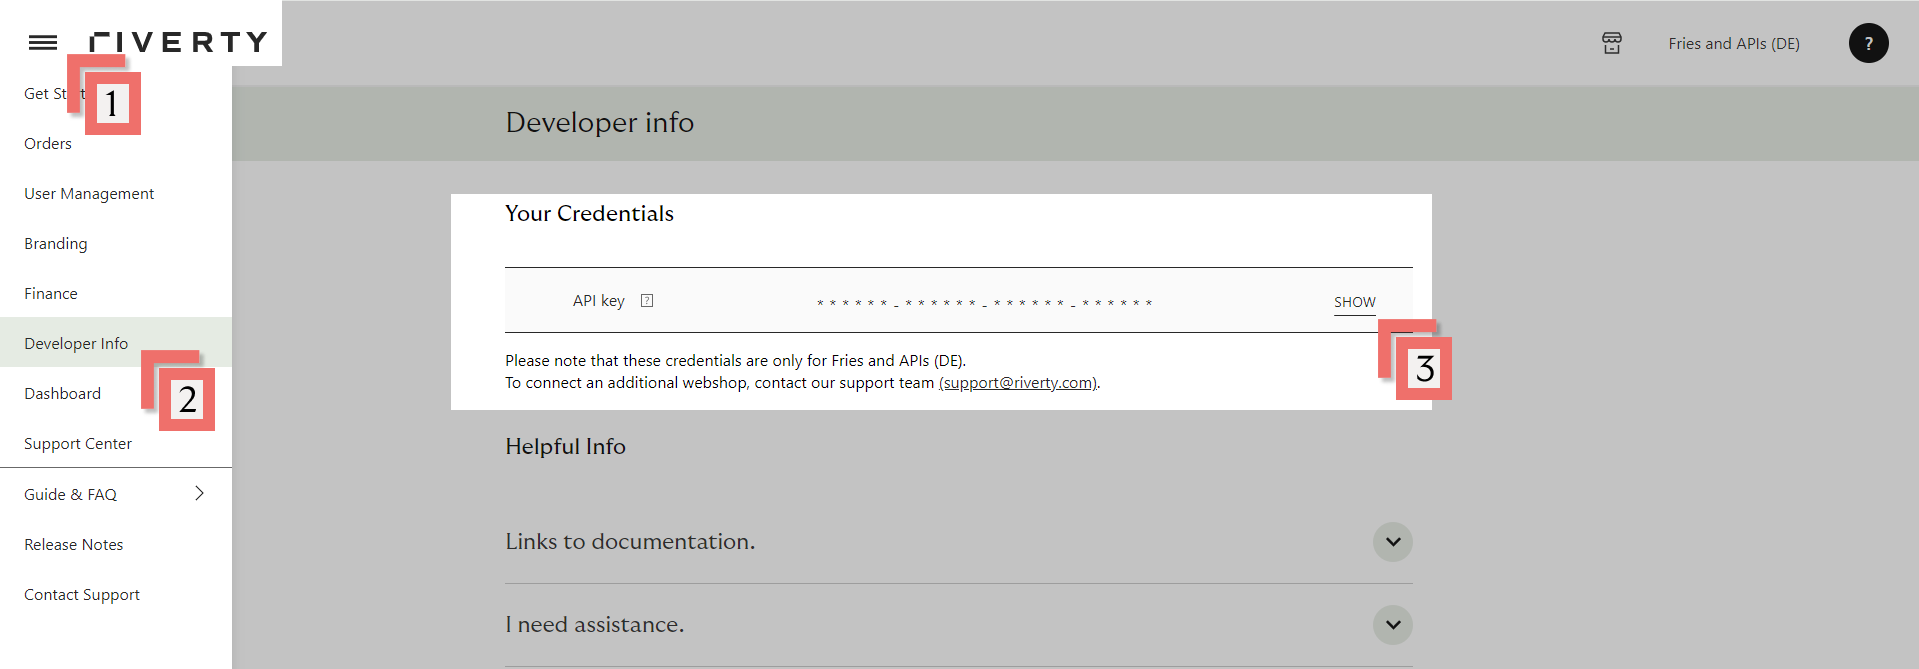
- Open the left menu
- Choose Developer Info in the left menu
- Show your API Key (This is only visible to Merchant Portal users with rights 'Administrator')
- If you just want to try Riverty without commitment, you can get one via the Developer Sandbox.
- For DACH merchants, you will receive an API key per country and per webshop.
- For BENELUX merchants, you will receive an API key per country, per webshop, and per payment method.
Step 2: Plugin Installation
The Riverty Prestashop plugin is currently only available as ZIP file. In the near future it will be available through the Prestashop Marketplace.
Download the Riverty Prestashop plugin
You can download the latest version of the Riverty Prestashop plugin (version 1.9.0) below:
Manual Installation
The installation of the Prestashop Plugin can be done through the Prestashop Module Manager, which can be found under:
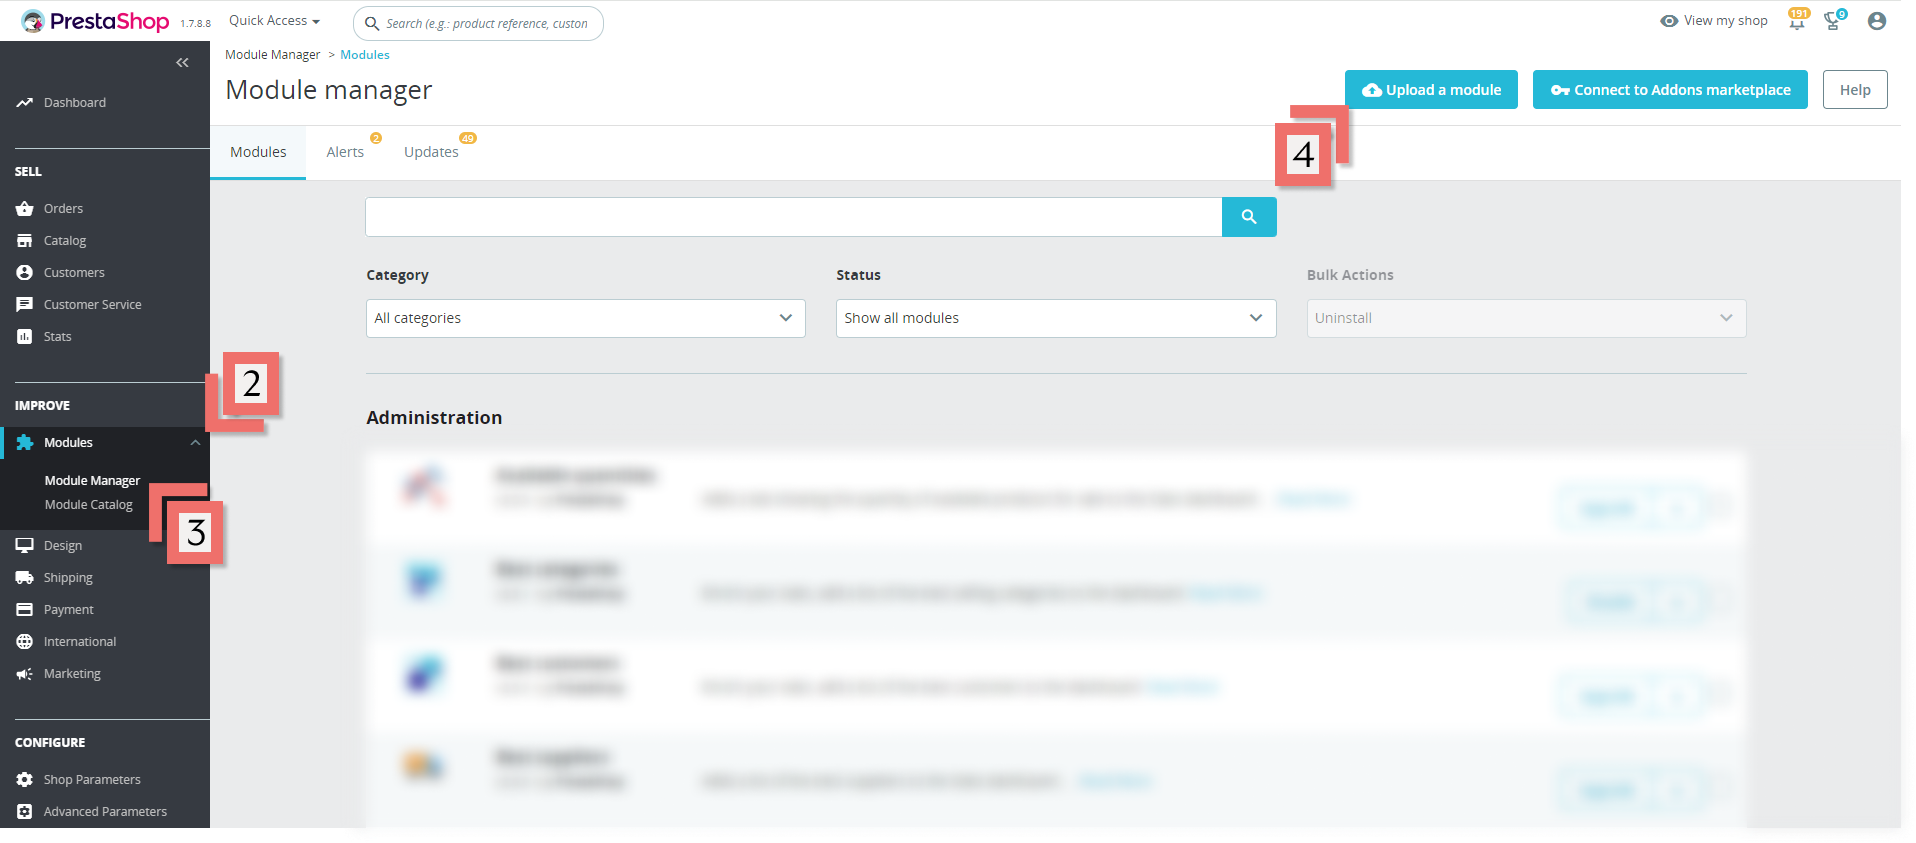
- Sign into your PrestaShop Admin Account
- Click Modules under Improve
- Click Module Manager
- Upload the below Riverty Module ZIP File
- Once the ZIP file successfull uploads, click Configure
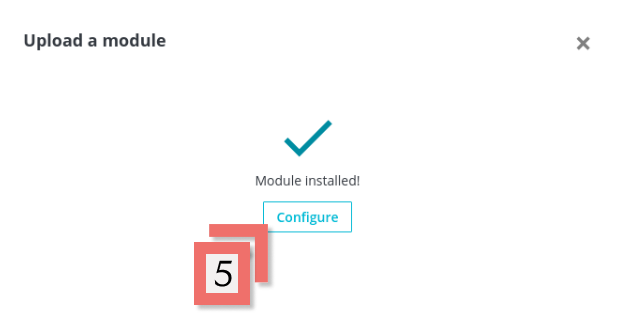
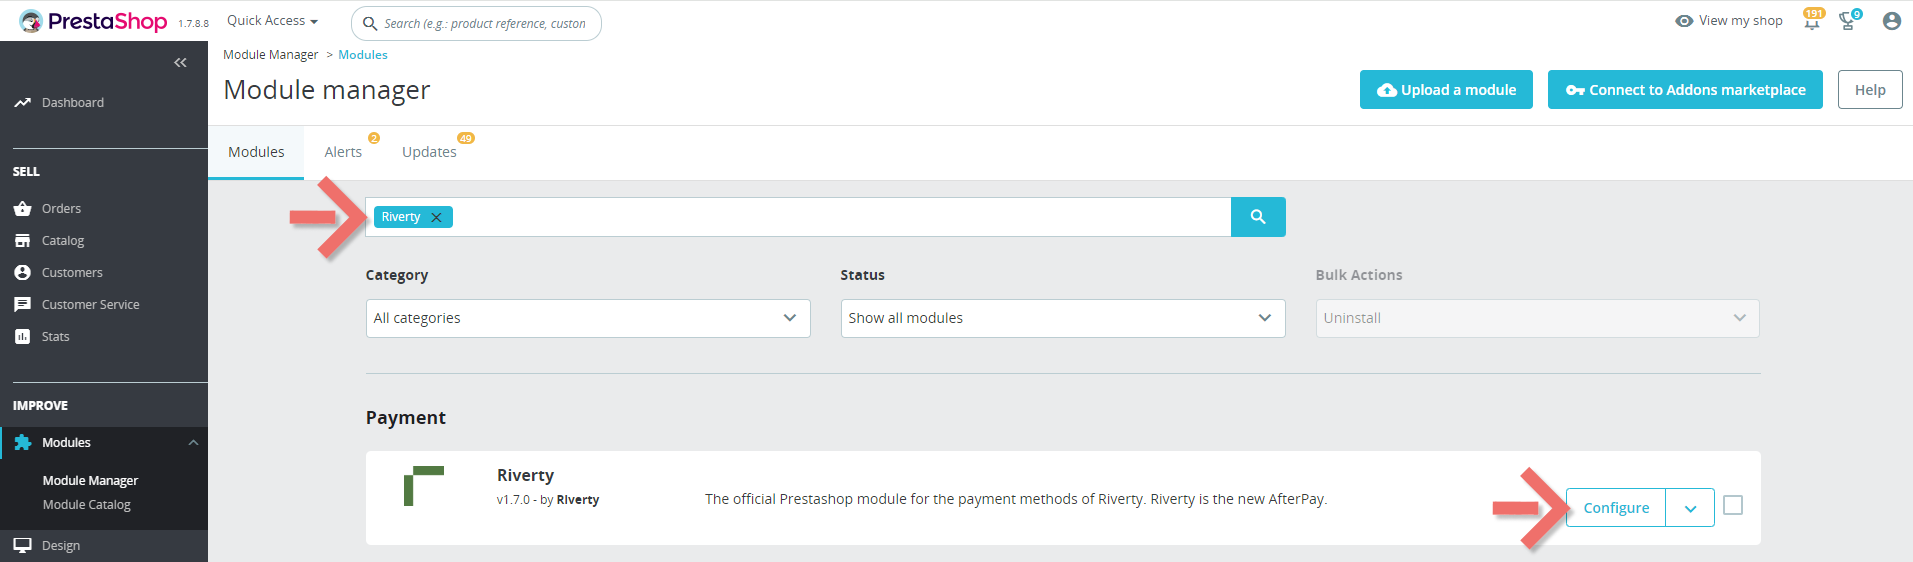
6. If you accidentally closed the module upload before clicking configure, you can search for Riverty in the module manager and click configure
Step 3: Configure Settings
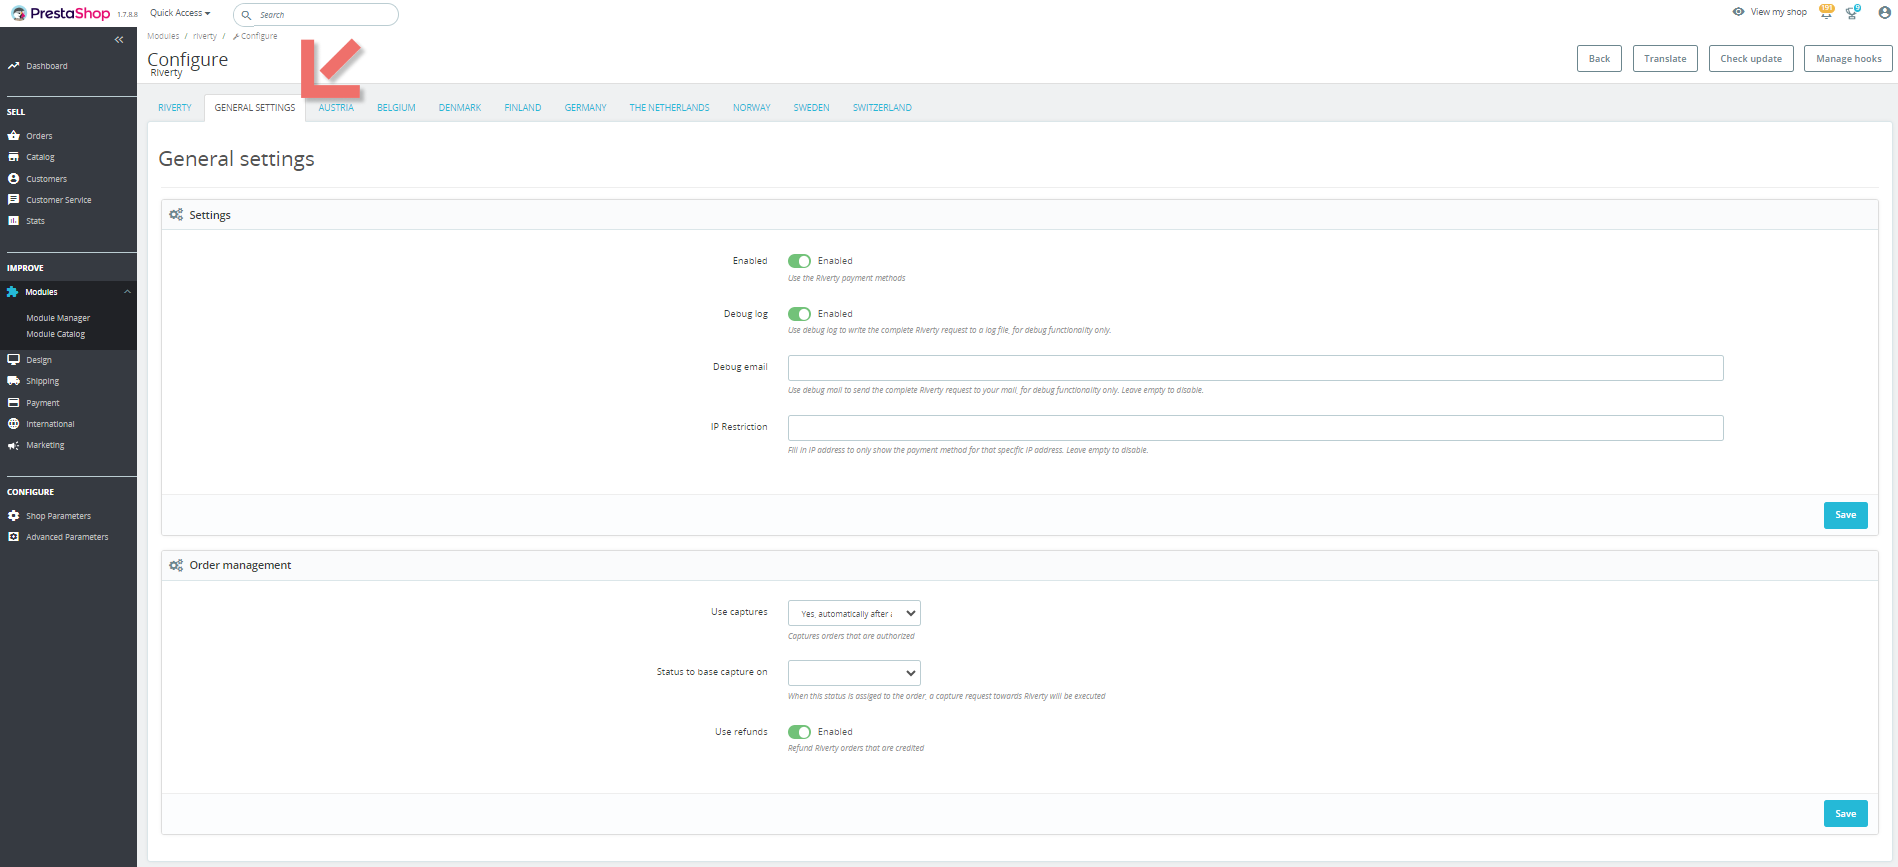
General Settings
Click General Settings and apply those settings that best fit your shop’s needs. Additional information is found in the table below.
| Setting | Description |
|---|---|
| Enabled | If this is set to Yes, the Riverty payment module will be enabled and ready to use. |
| Debug log | If this is set to Yes, a debug log will be written to the folder var/logs. This log will contain information from the requests and responses to Riverty. It is advised to not use this function in production. |
| Debug email | The debug email can be used to send the debug log after a transaction is completed. |
| IP Restriction | With the IP restriction the payment method can be shown only to customers with a certain IP. this can be used for example in the testing phase, to not show the payment method to everyone. To enable this, the IP address should be filled in. |
| Use captures | If this is set to 'Yes, automatically after authorization' , the Riverty payment module will automatically sent a capture request to Riverty after the order is accepted by Riverty. After a capture request is done Riverty will start the invoicing process. 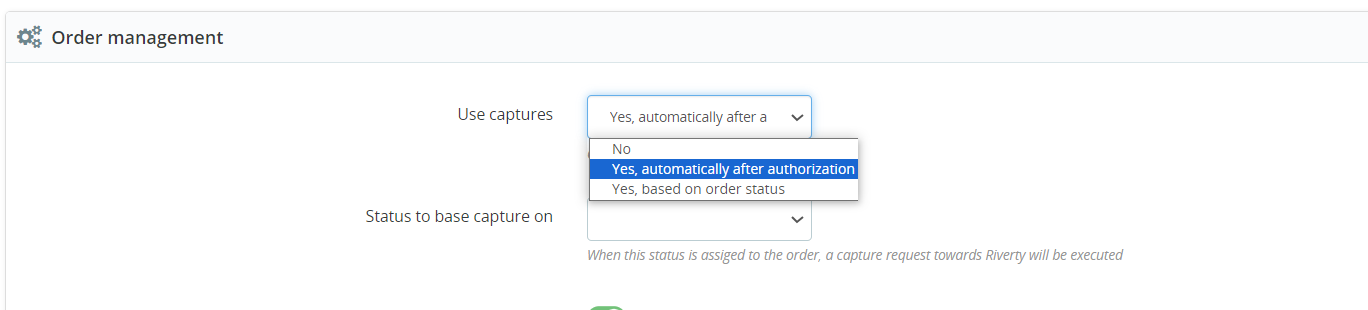 If you set to 'Yes, based on order status', the Riverty payment module will send the Capture request based on the status you select If you set to 'Yes, based on order status', the Riverty payment module will send the Capture request based on the status you select |
| Status to base capture on | The Capture request will be triggered based on the status you select from this dropdown |
| User refunds | Enable/disable. If set to Enable, the Riverty payment module will enabled refunds |
Payment Settings
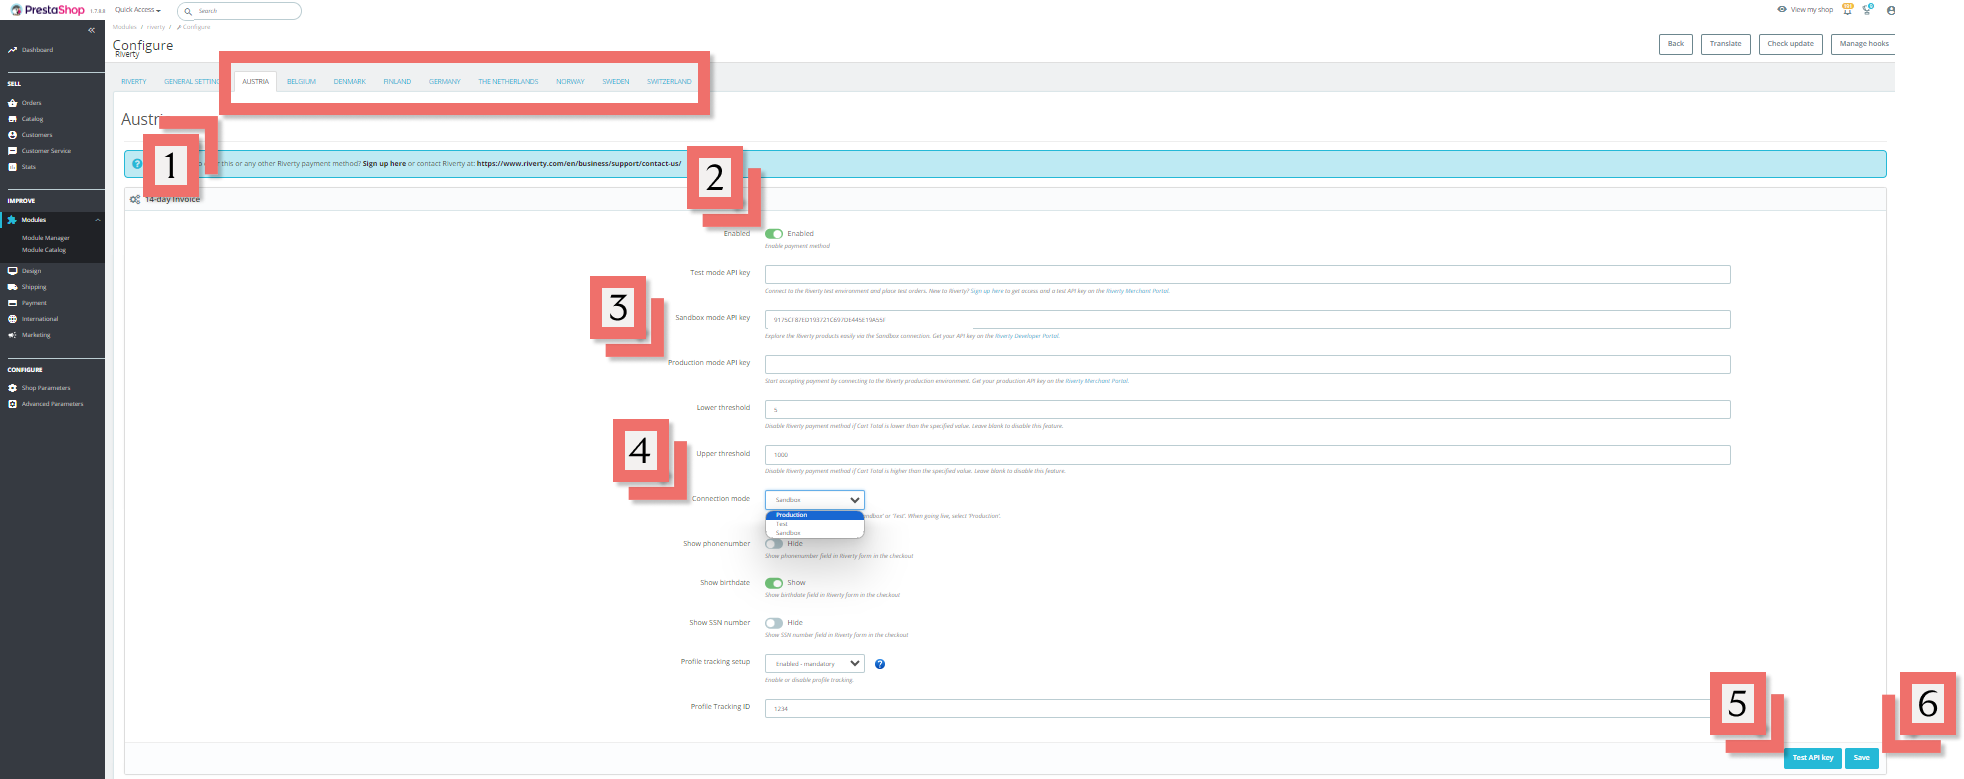
Important Note, “Payment Settings” must be completed for each selected country - payment method combination! For example, if you offer 14-day Invoice in the Netherlands and Belgium, you need to repeat these steps twice with two different API Keys. (See “Step 1: Retrieve API Keys” for more information about the different API Keys)
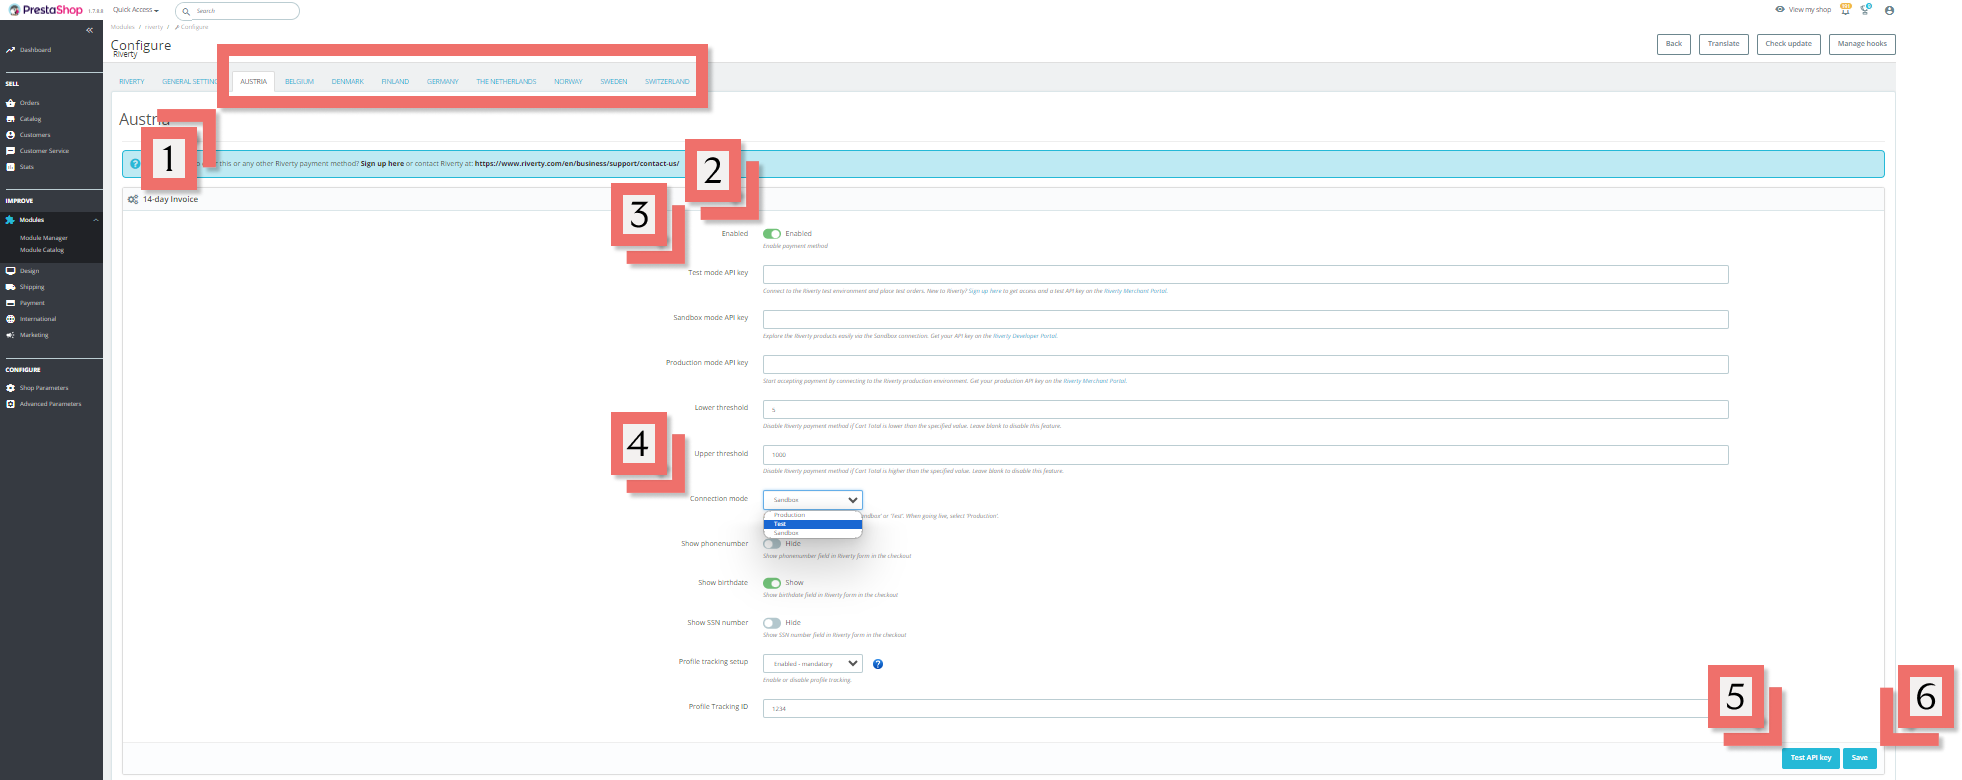
- Select the wanted country and scroll to the wanted payment method.
- Enable the Payment Method
- Enter your API Key from the Merchant Portal into Test mode API Key. Your API Key can be found on our Test Merchant Portal
- Note, you may use your Sandbox API Key from Merchant Portal in “Sandbox mode API Key”
- Select Test in Environment
- Note, if you are testing with your Sandbox API Key, select Sandbox instead
- Click Test API Key and a green checkmark should appear
- If the API key test fails, double check the key for typos and confirm it is for the selected environment
- Click Save
- Note, if you are using Sandbox first, you will need to repeat this step with your Test API Key when you are ready
- There are additional, optional settings available per payment method. See more information below and configure those that fit your shop’s needs:
| Setting | Description |
|---|---|
| Enabled | If this is set to Yes, this Riverty payment method will be available to customers in this country. |
| Test mode API Key | The test API key from Merchant Portal |
| Sandbox mode API Key | Test API Key from Sandbox |
| Production mode API Key | The production/Live API key from Merchant Portal |
| Lower threshold | The smallest purchase that a customer can make in your webshop when paying with Riverty. If the total sum of the shopping cart is lower than this number, this payment method is not displayed at checkout. Leave empty to set no bottom limit. |
| Upper Threshold | The biggest purchase that a customer can make in your webshop when paying with Riverty. If the total sum of the shopping cart is higher than this number, this payment method is not displayed at checkout. Leave empty to set no upper limit. |
| Connection Mode | Production, test, sandbox |
| Show phonenumber | If this is set to Yes, the Riverty section of your checkout page will ask the customer to enter their phone number. |
| Show birthdate | If this is set to Yes, the Riverty section of your checkout page will ask the customer to enter their date of birth. |
| Show SSN Number | If this is set to Yes, the Riverty section of your checkout page will ask the customer to enter their SSN number. |
The following options are available on some payment methods:
| Setting | Description |
|---|---|
| Show Bank IBAN input field | If this is set to Yes, the Riverty section of your checkout page will ask the customer to enter their Bank IBAN number. |
| Show Bank BIC / Swift input field | If this is set to Yes, the Riverty section of your checkout page will ask the customer to enter their Bank BIC / Swift code. |
| Show company name input field | If this is set to Yes, the Riverty section of your checkout page will ask the customer to enter their company name. |
| Show chamber of commerce number input field | If this is set to Yes, the Riverty section of your checkout page will ask the customer to enter their chamber of commerce number. |
Step 4: Complete Testing
After completing the setup and tested the API Key, the next step is to test the settings. Everyone must complete the Standard Test Scenarios & Customer Facing Messages. Then also complete the test scenario(s) for each payment method you intend to activate. Be sure to log the Order Number you used for each test case, then submit the completed table to your Riverty Implementation Manager.
Self-Check Before Submission
You can self-check your test cases before submission to the Riverty Implementation Manager using the Get Order call. The response will show you how the transactions registered on Riverty’s side. Completing a self-check greatly increases the chances of passing testing on the first attempt. We suggest using Postman to complete a self-check.
Standard Test Scenarios
| # | Test Case | Order Number |
|---|---|---|
| 1. | Test an order with multiple products | |
| 2. | Test an order with a fixed discount | |
| 3. | Test an order with a percentual discount | |
| 4. | Test an order with a shipping fee | |
| 5. | Test an order with an alternate delivery address | |
| 6. | Test an order with pick-up points (if applicable) | |
| 7. | Test an order with store pick-up (if applicable) | |
| 8. | Test an order with a house number addition | |
| 9. | Test and make sure the VAT is correctly received by Riverty |
Customer Facing Messages
It is also necessary to check if the error messages are correctly shown to the customer.
- Test a rejected authorize. Please make sure that the customer friendly message is displayed correctly in the check-out.
- Test validation error. Please make sure that the customer friendly message is displayed correctly in the check-out.
Payment method scenarios
After you tested all standard scenarios for the 14-day invoice you should start testing the other payment methods you activated. Please complete the tables with your order numbers and send them to your Riverty Implementation Manager.
Direct Debit
| # | Test Case | Order Number |
|---|---|---|
| D-1. | Test an order with the Direct Debit payment method |
B2B Invoice
| # | Test Case | Order Number |
|---|---|---|
| B-1. | Test an order with the Business to Business payment method |
Campaign Invoice
| # | Test Case | Order Number |
|---|---|---|
| I-1. | Test an order with 3 month installments | |
| I-2. | Test an order with 6 month installments (if applicable) | |
| I-3. | Test an order with 12 month installments (if applicable) |
Installments
| # | Test Case | Order Number |
|---|---|---|
| C-1. | Test an order with the Campaign invoice payment method |
Step 5: Configure Production
Once you have completed testing a Riverty Representative will provide you with your Live API Key or make it available via the Live Merchant Portal. You can then set up your Production Environment.
- Select the Country and Payment Method you would like to activate
- Make sure the payment method is enabled
- Enter your Live API Key Production mode API Key
- Select Production in Connection mode
- Click Save Changes
- Click Test API Key and a green checkmark should appear
- If the API key test fails, double check the key for typos and confirm it is for the selected environment
- Click Save