PHP
PHP (Hypertext Preprocessor) is a widely-used open-source scripting language for web development, executing on the server-side to create dynamic web pages and web applications.
Website: https://www.php.net/
Type: SDK

Introduction
This guide describes how to connect to our API, using our Riverty.com PHP SDK. It only covers the creation and submission of an order. Information and examples of other operations, like capture, cancel and refund, can be found in the package.
PHP currently offers these payment methods:
- 14-day invoice - This is the default 14-day invoice payment method in Riverty. It is primarily meant for business-to-consumer sales.
- Direct Debit - This is a Direct Debit version of the 14-day invoice payment method Instead of receiving an invoice to be paid via their bank, the customer enters their bank details, and the money is immediately deducted from their bank account.
- Campaign invoice
- Fixed instalments
- Flex payment
- B2B invoice - This is the B2B consumer version of the default 14-day invoice payment method in Riverty.
The available payment methods per country for PHP can be found in this table:
| Country | 14-day Invoice | Direct Debit | Campaign Invoice | Fixed Installments | B2B Invoice |
|---|---|---|---|---|---|
| The Netherlands | x | x | x | ||
| Belgium | x | ||||
| Germany | x | x | x | x | |
| Austria | x | x | x | ||
| Switzerland | x | ||||
| Sweden | x | x | x | x | |
| Norway | x | x | x | x | |
| Finland | x | x | x | x | |
| Denmark | x | x | x | x |
Include library using Composer
- Include the Riverty PHP Library by using Composer. If you are not familiar with using Composer, read this article with the basics about PHP Composer: http://culttt.com/2013/01/07/what-is-php-composer/. The AfterPay PHP Library can be found on packagist.org as “Payintegrator/Afterpay” (Details and releasenotes: link). The library can be included by the following command:
composer require payintegrator/afterpay
- Next make sure you are using the Autoloader:
require 'vendor/autoload.php';
- Create an empty object, for example using:
$riverty = new AfterpayAfterpay();
$riverty->setRest();
This object will be used to store the information of your order and to send an order to the Riverty API.
Creating order lines
With the function $riverty->create_order_line you can send the specification of the order lines.
You can use this for any type of orderline, i.e.:
products
shipping fee
service fee
discount
Note: prices are to be submitted in cents, including TAX.
Below is an example of an orderline for a product.
$sku = 'PRODUCT-001';
$name = 'Product name 1';
$qty = 3;
$grossUnitPrice = 2000; // in cents, including TAX (for discounts, use a negative number)
$vatAmount = 347; //in cents
$productUrl = "https://www.riverty.com/products/brown_wool_hat.jpg";
$imageUrl = "https://www.riverty.com/images/brown_wool_hat.jpg";
$riverty->create_order_line( $sku, $name, $qty, $grossUnitPrice, null, $vatAmount, null, null, $productUrl, $imageUrl );
Set-up address and other information
In this step you set up the general order information and configure the Riverty object with this information. This contains the billing and shipping information and other relevant information like the ordernumber, the currency and the remote ip address of the customer.
Below is an example of a B2C order.
// Set up the bill to address
$order['billtoaddress']['city'] = 'Heerenveen';
$order['billtoaddress']['housenumber'] = '90';
$order['billtoaddress']['housenumberaddition'] = '5';
$order['billtoaddress']['isocountrycode'] = 'NL';
$order['billtoaddress']['postalcode'] = '8441ER';
$order['billtoaddress']['referenceperson']['dob'] = '1980-12-12T00:00:00';
$order['billtoaddress']['referenceperson']['email'] = 'tester@riverty.com;
$order['billtoaddress']['referenceperson']['initials'] = 'A';
$order['billtoaddress']['referenceperson']['isolanguage'] = 'NL';
$order['billtoaddress']['referenceperson']['lastname'] = 'de Tester';
$order['billtoaddress']['referenceperson']['phonenumber'] = '0513744112';
$order['billtoaddress']['streetname'] = 'KR Poststraat';

// Set up the ship to address
$order['shiptoaddress']['city'] = 'Heerenveen';
$order['shiptoaddress']['housenumber'] = '90';
$order['shiptoaddress']['housenumberaddition'] = '5';
$order['shiptoaddress']['isocountrycode'] = 'NL';
$order['shiptoaddress']['postalcode'] = '8441ER';
$order['shiptoaddress']['referenceperson']['dob'] = '1980-12-12T00:00:00';
$order['shiptoaddress']['referenceperson']['email'] = 'tester@riverty.com';
$order['shiptoaddress']['referenceperson']['initials'] = 'A';
$order['shiptoaddress']['referenceperson']['isolanguage'] = 'NL';
$order['shiptoaddress']['referenceperson']['lastname'] = 'de Tester';
$order['shiptoaddress']['referenceperson']['phonenumber'] = '0513744112';
$order['shiptoaddress']['streetname'] = 'KR Poststraat';

// Set up the additional information
$order['ordernumber'] = 'ORDER123';
$order['currency'] = 'EUR';
$order['ipaddress'] = $_SERVER['REMOTE_ADDR'];

// Create the order object for B2C or B2B
$riverty->set_order( $aporder, 'B2C' );
Processing the return object
The result of the order will be set in the object $riverty->order_result. You can process the order, using the information in the object. Below is an overview of possible resultIDs in the object.
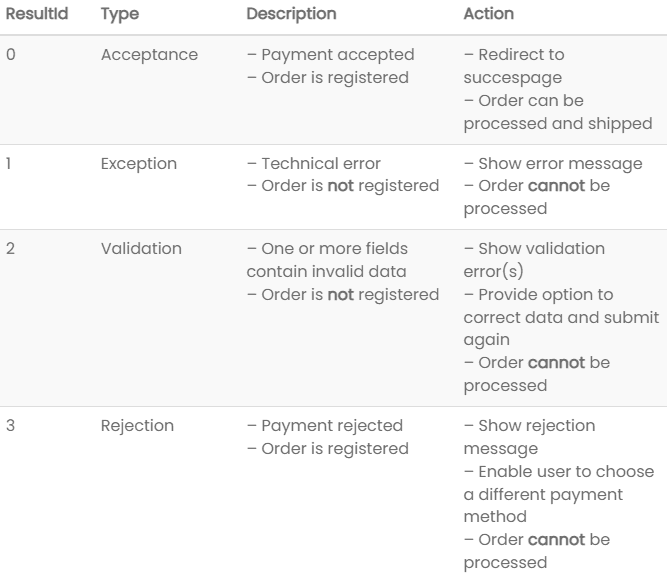
Example return objects
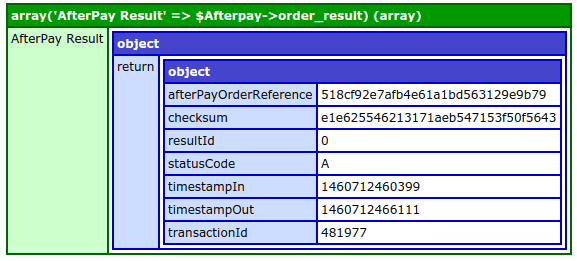
ResultId 0 – Accepted payment
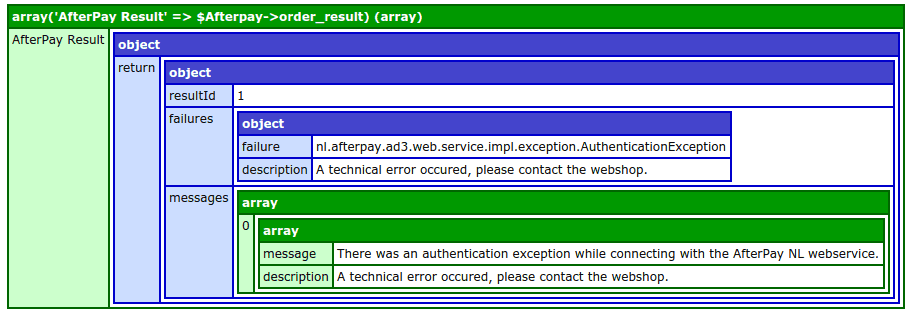
ResultId 1 – Technical error
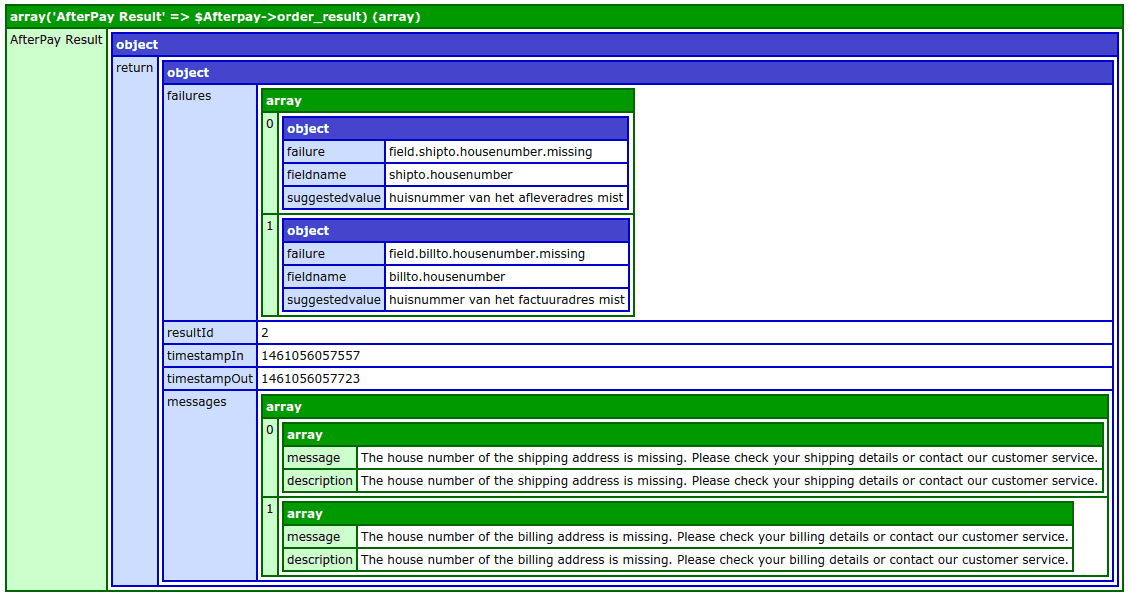
ResultId 2 – Validation error
ResultId 3 – Rejected payment
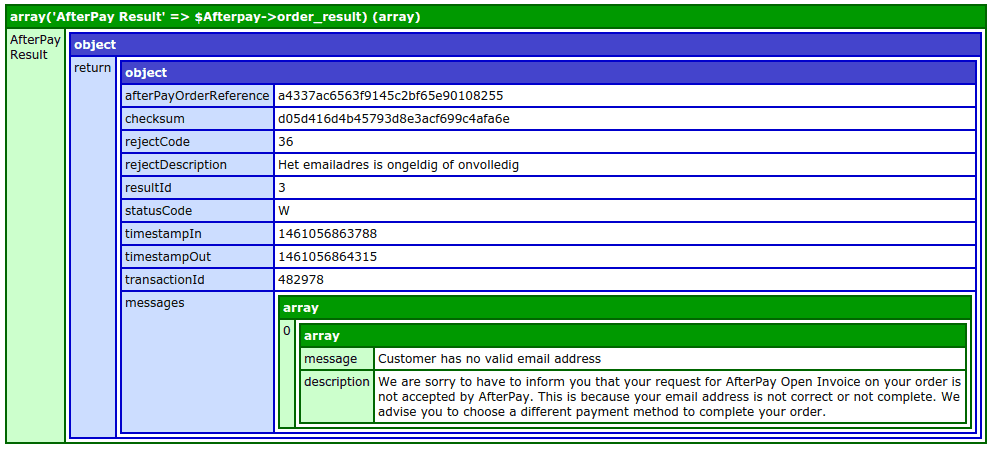
Processing messages and descriptions
Each returnobject contains an array with 1 or more
messages: these are for logging and debugging
descriptions: these are to be displayed in the webshop
foreach ($riverty->order_result->return->messages as $message)
{
    echo $message['message'];
}
Echo’s all the messages in the array.
foreach ($riverty->order_result->return->messages as $message)
{
    echo $message['description'];
}
Echo’s all the descriptions in the array.
Submit testorders
ResultId 0 – accepted payment
To check the submission of successful orders, place an testorder for each payment method with:
- multiple products
- discount (if possible)
- shipping fee (if possible)
- service fee (if allowed)
- alternate delivery address
Below you will find the testdata that can be used.
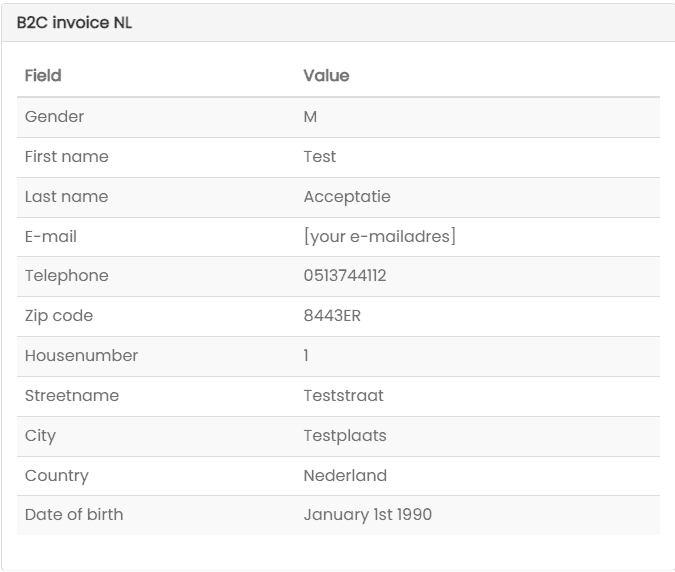
ResultId 1 – technical error
To verify and process a technical error, place a regular order, but trigger a technical error, for example using:
- 0 as API key
ResultId 2 – validation error
To verify and process a validation error, place a regular order, but use invalid data, for example:
- telephone number consisting of 9 digits, i.e.: 051322334
- postal code using only letters, i.e.: ABCD
- name with number in it, i.e.: John Doe 123
ResultId 3 – rejected payment
To verify and process a rejected payment, place a regular order, but use the first name 'Reject' while communicating towards the sandbox environment.