Shopware 5 Manual
Before Starting
The payment methods that are available via Shopware 5:
| Country | 14-day Invoice | Direct Debit | Fixed Installments | Pay-in-3 |
|---|---|---|---|---|
| Germany | ✔ | ✔ | ✔ | |
| Austria | ✔ | ✔ | ✔ | |
| The Netherlands | ✔ | ✔ |
Merchant Portal Account
The below instructions explain how to connect Riverty Payment methods to your Shopware 6 webshop.
Please be sure to create a free Merchant Portal Account to get in contact with sales and complete the integration process.
Important Links
Compatibility
Shopware instance version 5 up to 5.7.11, installed on your webserver.

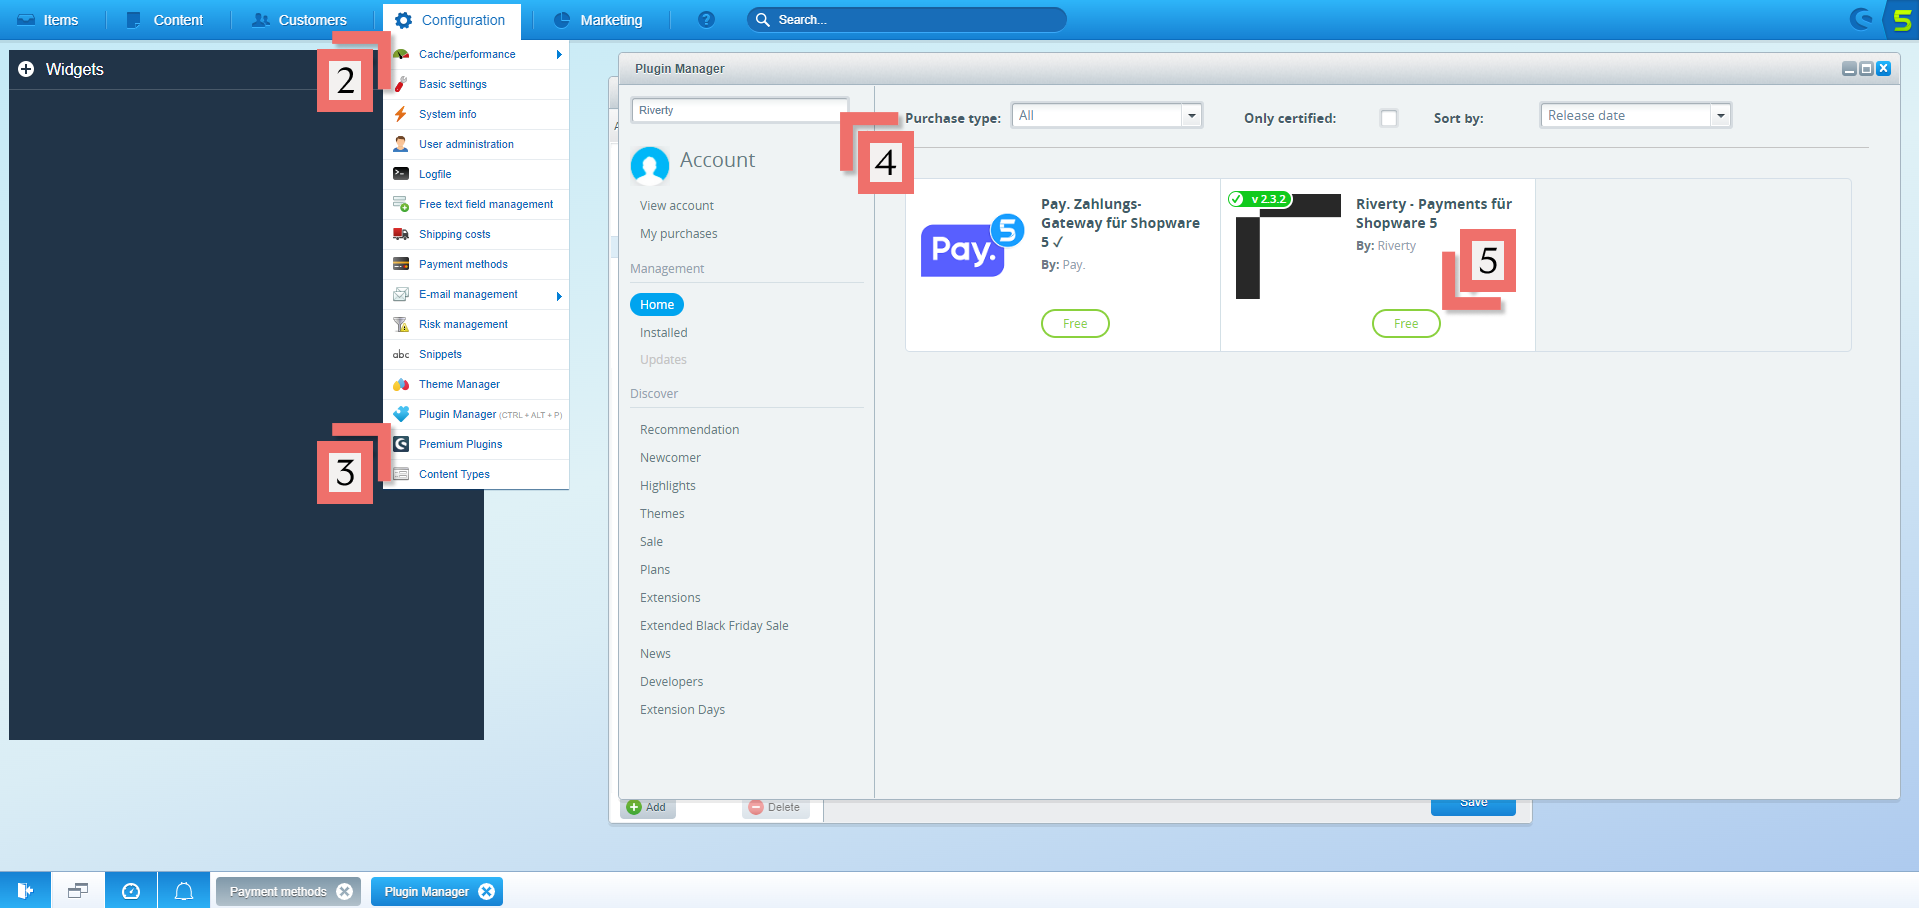
Step 2: Select Plugin Settings
- Click on Configuration
- Click on Basic Settings
- Click on Additional Settings
- Click on Riverty: Invoice …
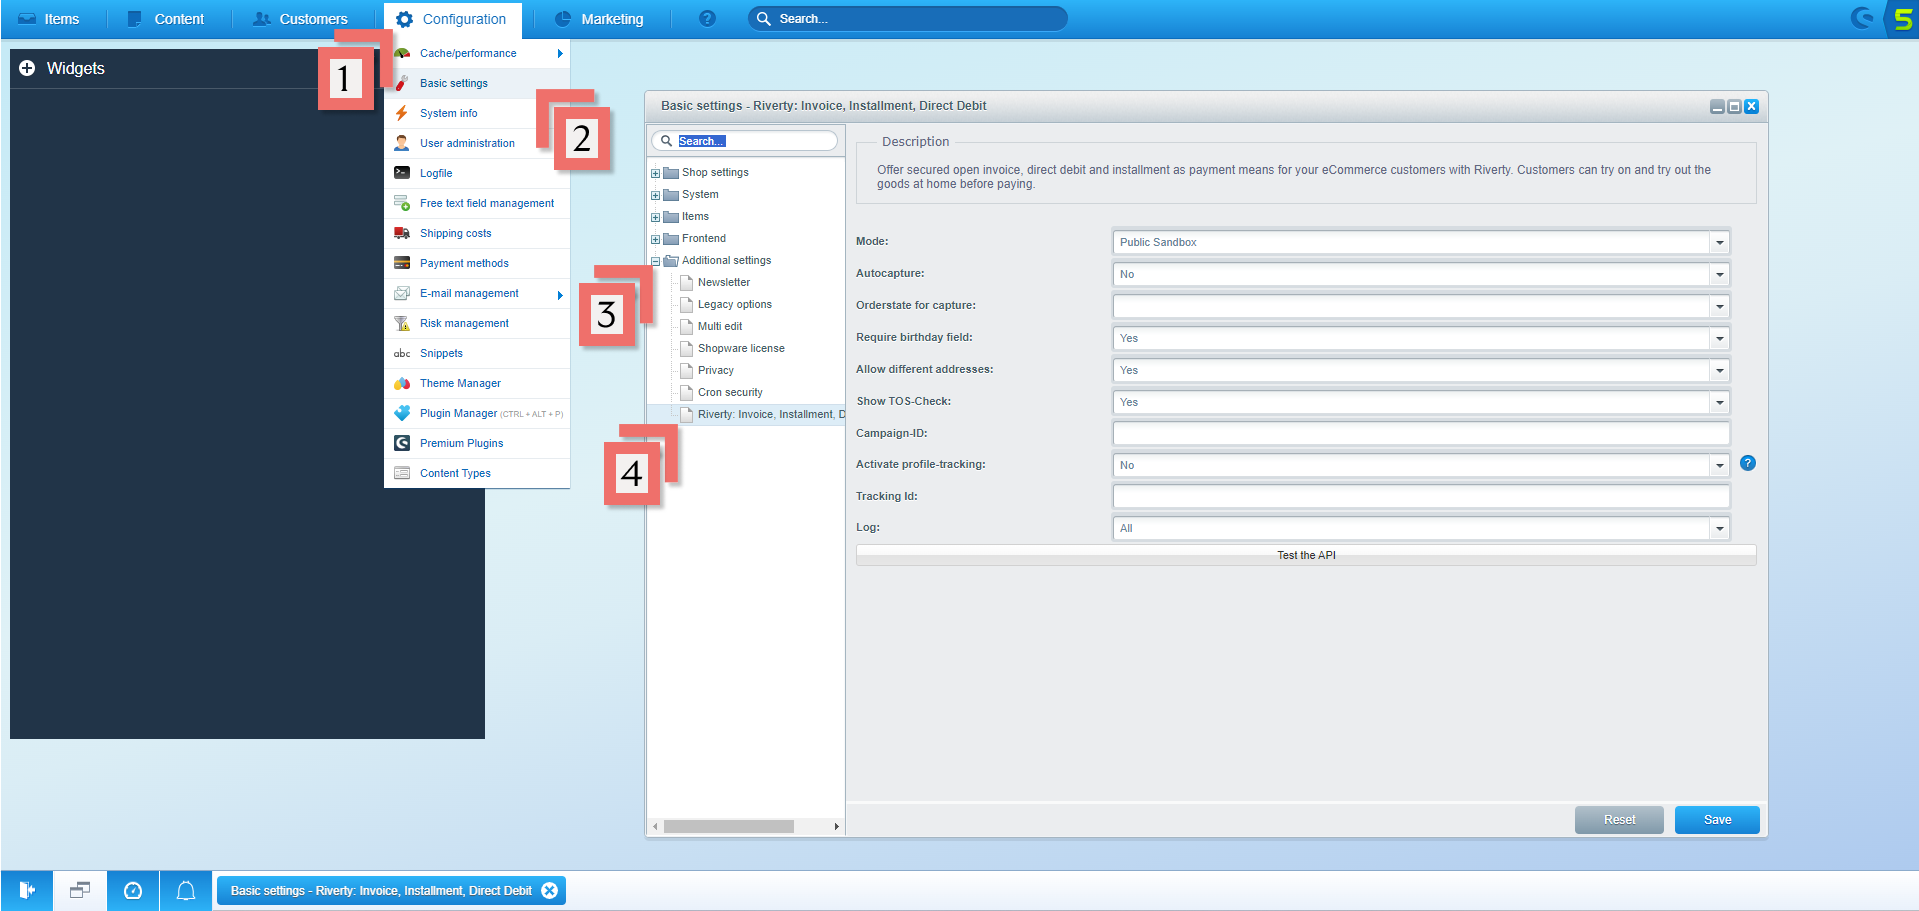
Setting Descriptions
- Mode: This setting determines whether the plugin runs in testing or live mode.
- Autocapture: If activated, the plugin will trigger an automated capture via cronjob based on current order status.
- Order state for capture: This defines the order status which will trigger an automated capture.
- Require birthday field: Prompt for date of birth if none was entered during the registration process.
- Allow different addresses: Allow shipping address to differ from billing address when using a Riverty payment method.
- Show TOS-check: Display a checkbox with terms and conditions / additional information during checkout. The message can be customized by editing the ConfirmMerchantCheck boilerplate.
- Campaign-ID: This ID is transmitted by Riverty when using the “Campaign“ payment method.
- Activate Profile Tracking: Please only activate this when asked to do so by Riverty.
- Tracking Id: Please consult Riverty to receive your Profile Tracking Id.
- Log: Defines the logging level. Log files will be stored in the plugin folder.
Step 3: Retrieve API Key
Leave your Shopware Settings Panel Open. Choose one of the below options to access and API Key:
- Open your Live Merchant Portal if you have complete KYC & Contract Signing
- Open your Test Merchant Portal if you have completed our 5 Minute Onboarding to access a Test Merchant Portal
- Open your Sandbox Account if you do not want to complete free onboarding at this time
Access API Key in Merchant Portal
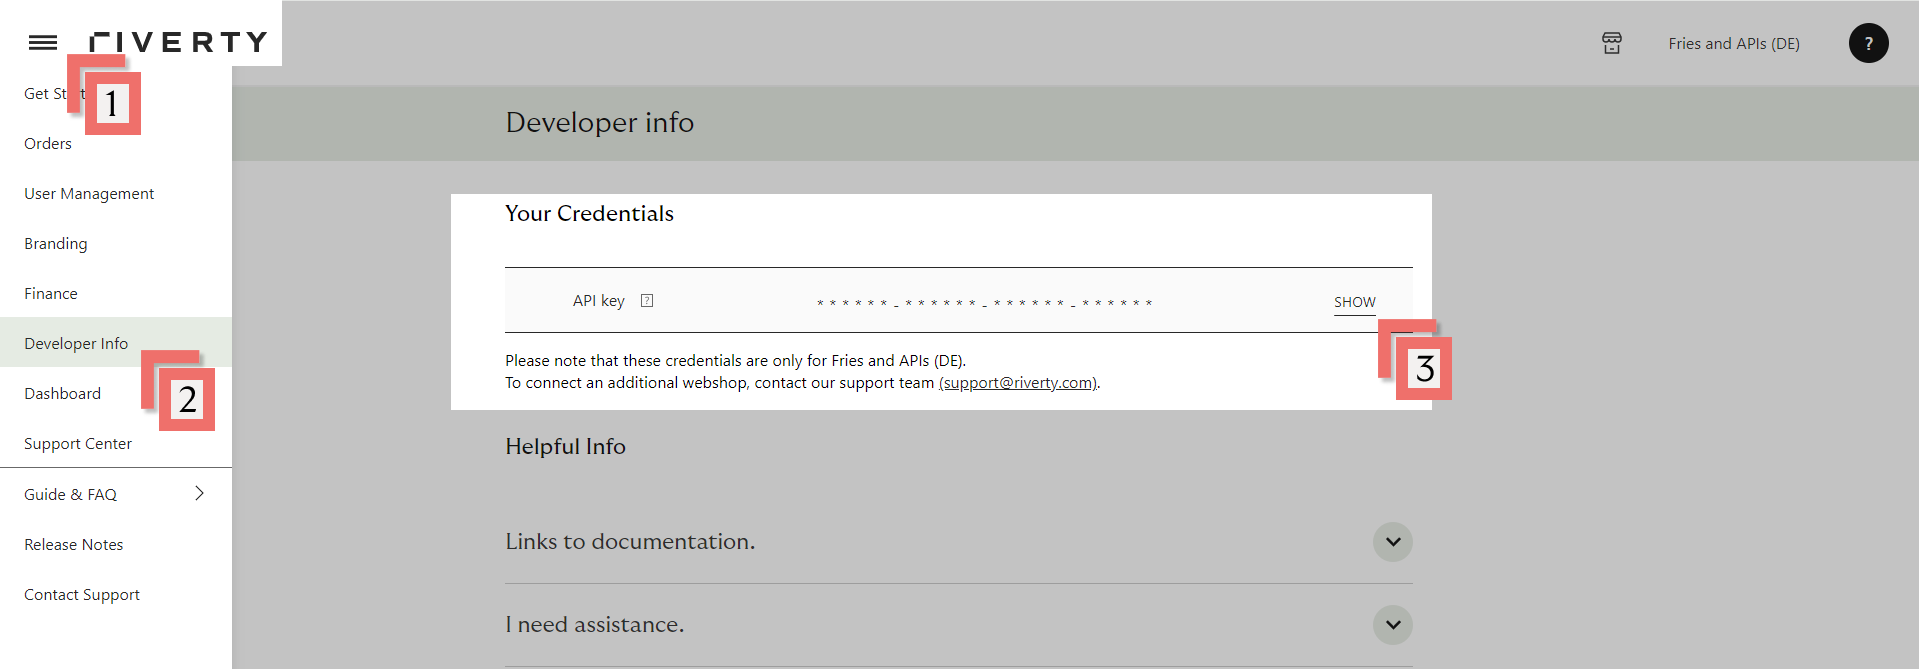
- Open the left menu
- Choose Developer Info in the left menu
- Show your API Key (This is only visible to Merchant Portal users with rights 'Administrator')
Note, you will need to switch countries/shops in the top-right corner of the Riverty Merchant Portal if you plan on using multiple API Keys.
- DACH merchants, will receive an API key per country and per webshop
- BENELUX merchants, will receive an API key per country, per webshop, and per payment method

Step 4: Configure Payment Methods Settings
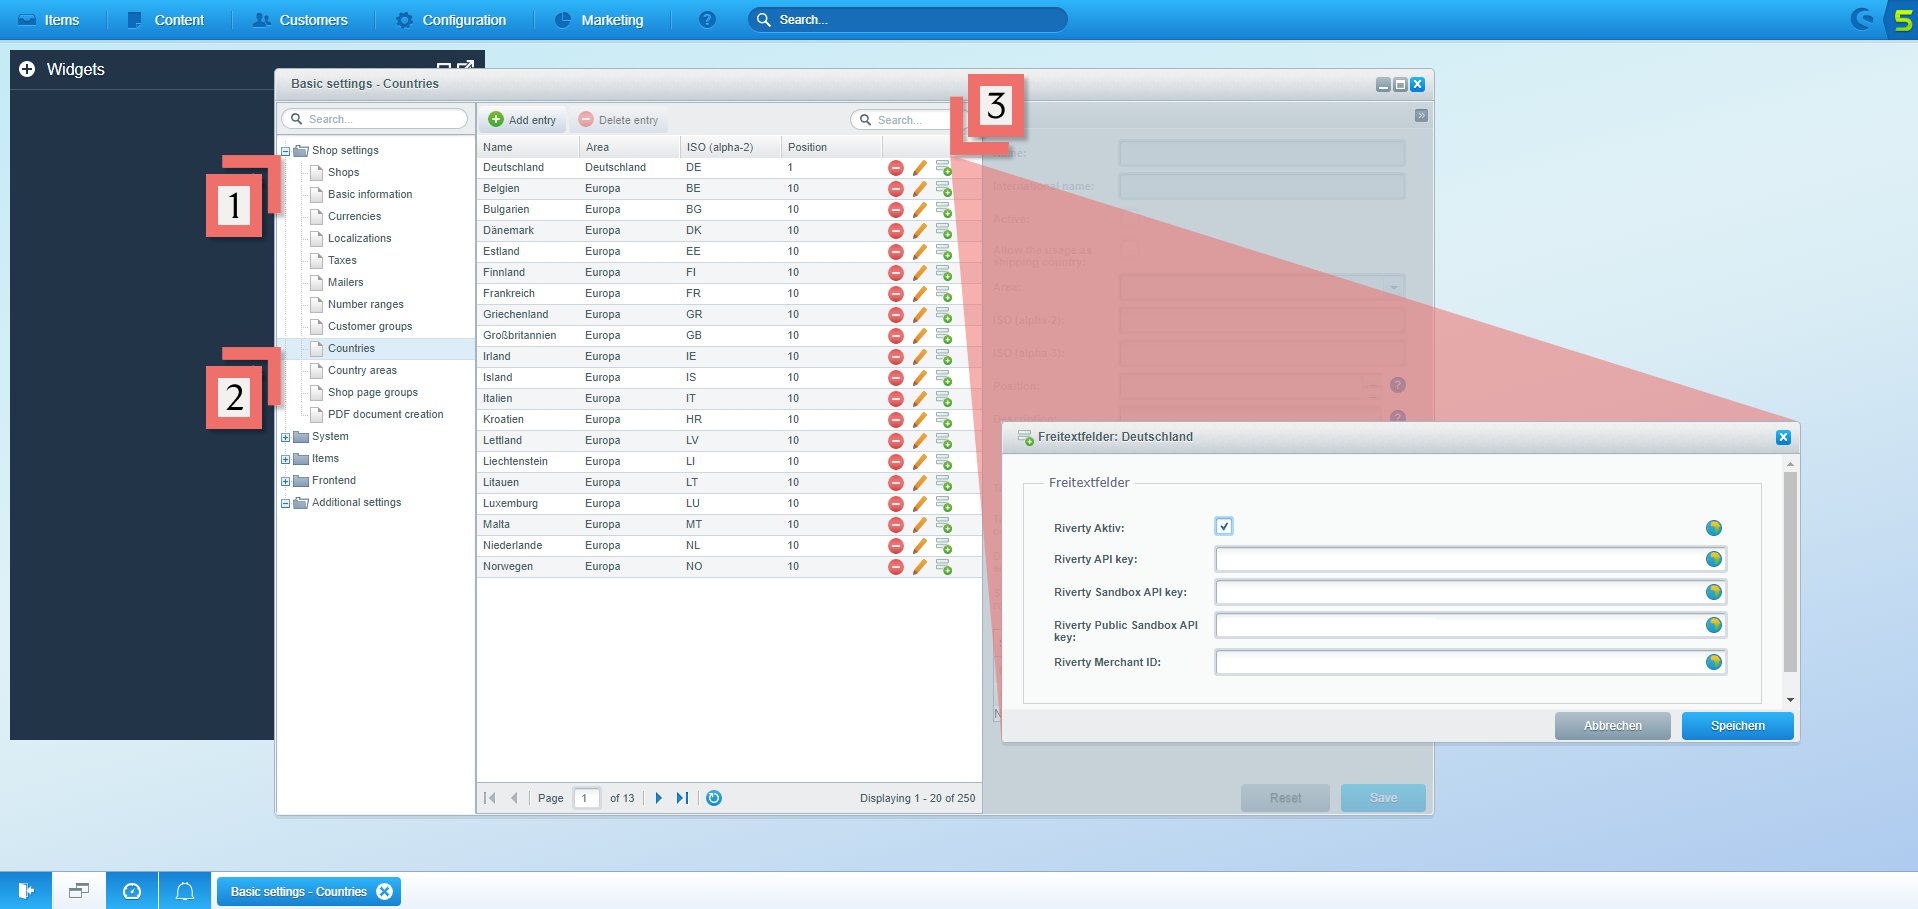
- Click Shop Settings
- Click Countries
- Click the Free Text Fields symbol and fill the settings as described below:
Setting Descriptions
- Aktiv: Determines whether Riverty payment methods are offered in this country.
- Riverty API key: X-Auth Key for live operation, will be communicated by Riverty after KYC and Contract Signing
- Riverty Sandbox API key: X-Auth Key for test operation can be retrieved from your Test Merchant Portal
- Riverty Public Sandbox API key: X-Auth Key for the public sandbox from Riverty’s Sandbox Account
- Riverty Merchant ID: Only fill in if communicated by Riverty. Used to customize terms and conditions displayed during checkout.
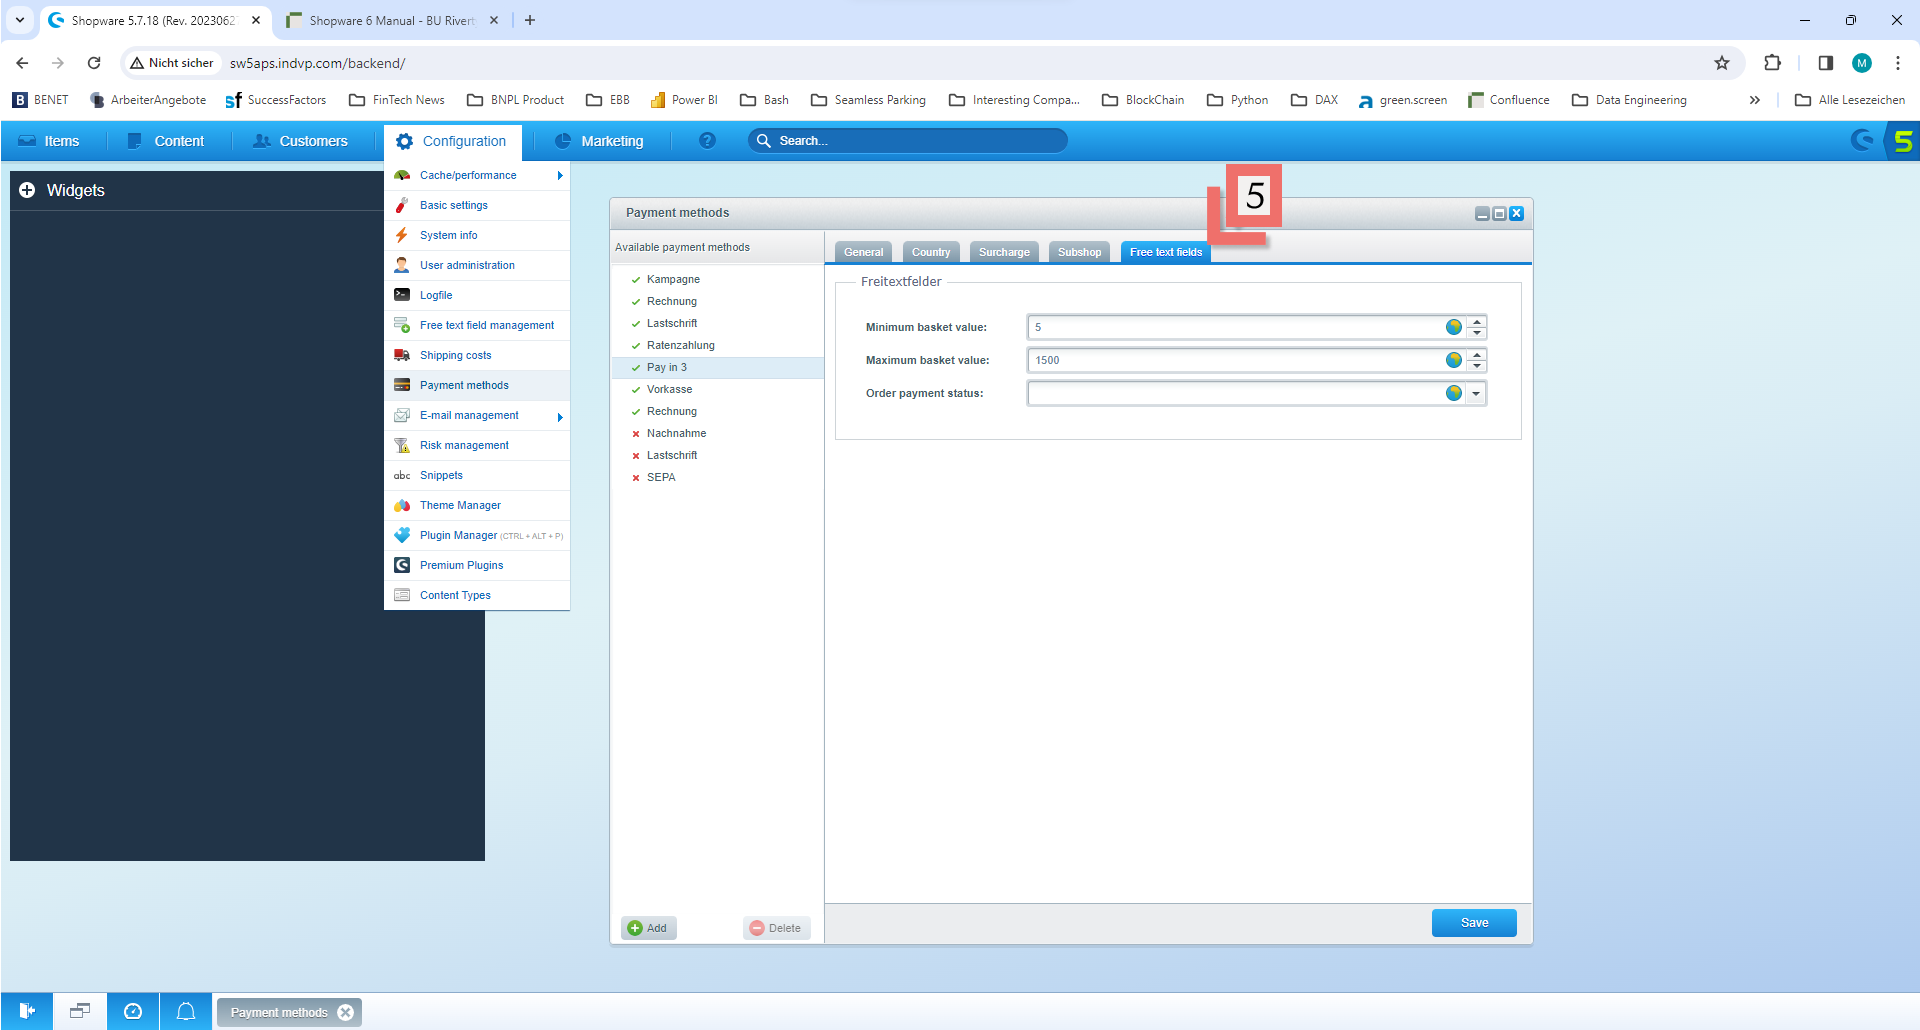
Payment method settings

- Click Configure
- Click Payment Methods
- Click one of your wanted Payment Methods
- Check the Active checkbox
- Click Free Text Fields and fill the settings as described below:
Setting Descriptions
- Minimum basket value: Lowest gross value of shopping cart (including shipping and fees) from which the payment method shall be offered.
- Maximum basket value: Highest gross value of shopping cart (including shipping and fees) up to which the payment method shall be offered.
- Order payment status: This determines the payment status assigned to the order after successful authorization.
Step 5: Complete Testing
Please note, this step is optional. However, testing your connection reduces the chance of errors on live transactions.
Self-Check Before Submission
You can self-check your test cases before submission to the Riverty Implementation Manager using the Get Order request. The response will show you how the transactions registered on Riverty’s side. Completing a self-check greatly increases the chances of passing testing on the first attempt. We suggest using Postman to complete a self-check.
Standard Test Scenarios
| # | Test Case | Order Number |
|---|---|---|
| 1. | Test an order with multiple products | |
| 2. | Test an order with a fixed discount | |
| 3. | Test an order with a percentual discount | |
| 4. | Test an order with a shipping fee | |
| 5. | Test an order with an alternate delivery address | |
| 6. | Test an order with pick-up points (if applicable) | |
| 7. | Test an order with store pick-up (if applicable) | |
| 8. | Test an order with a house number addition | |
| 9. | Test and make sure the VAT is correctly received by Riverty |
Customer Facing Messages
It is also necessary to check if the error messages are correctly shown to the customer.
- Test a rejected authorize. Please make sure that the customer-friendly message is displayed correctly in the check-out.
- Test a validation error. Please make sure that the customer-friendly message is displayed correctly in the check-out.
Payment Method Scenarios
After you tested all standard scenarios for the 14-day invoice you should start testing the other payment methods you activated. Please complete the tables with your order numbers and send them to your Riverty Implementation Manager.
Direct Debit
| # | Test Case | Order Number |
|---|---|---|
| D-1. | Test an order with the Direct Debit payment method |
B2B Invoice
| # | Test Case | Order Number |
|---|---|---|
| B-1. | Test an order with the Business to Business payment method |
Installments
| # | Test Case | Order Number |
|---|---|---|
| I-1. | Test an order with 3 month installments | |
| I-2. | Test an order with 6 month installments (if applicable) | |
| I-3. | Test an order with 12 month installments (if applicable) |
Campaign Invoice
| # | Test Case | Order Number |
|---|---|---|
| C-1. | Test an order with the Campaign invoice payment method |
Final Check (BeNeLux Only)
Now that Riverty is live, we only have to check whether orders are also coming in properly. You can test this per Riverty connection by placing a rejected order:
- Go to the webshop, and place a product in the shopping cart.
- Go to checkout and fill in the necessary information, for the email address you have to enter rejection@afterpay.nl
- Choose the payment method Riverty and finish the order
- The Riverty order should be rejected. If this is not the case and instead, you receive a technical error or an authorization error, please contact your Riverty Implementation Manager